VirtualBox and GNS3
This section describes how to install and set up Cumulus VX with VirtualBox and GNS3 to create the two leaf and one spine topology shown below.
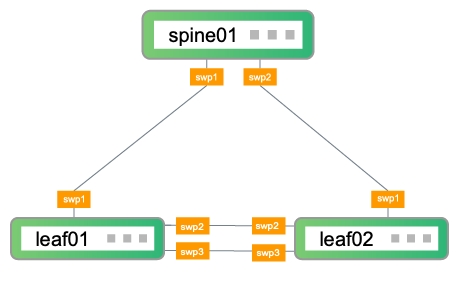
In the topology, leaf01 and leaf02 are the access layer switches on the network. leaf01 and leaf02 connect to spine01, which is the aggregation layer switch on the network. To facilitate additional configuration after the initial setup descibed in this guide, leaf01 and leaf02 also have two connections to each other.
Follow the steps below to:
- Create three VMs (leaf01, leaf02, and spine01) and the network connections between them
- Log into the switches
- Perform basic switch configuration
- Verify configuration
These steps were tested with Cumulus VX 4.2, VirtualBox version 6.1.12, and GNS3 version 2.2.11 on macOS version 10.14.6.
Create and Configure the VMs
The following procedure creates leaf01, leaf02, and spine01 and the network connections between them. This section assumes you have VirtualBox and GNS3 experience.
Download and Install the Software
- Download and install VirtualBox.
- Download and install GNS3.
- Download the VirtualBox OVA image.
Create VMs in VirtualBox
The Cumulus VX OVA image defines the CPU, memory, and disk requirements. Cumulus VX requires at least 768MB of RAM and 6GB of disk space.
CumulusVX versions 4.3 and later requires 2 vCPUs.
Follow these steps for each VM (leaf01, leaf02, and spine01)
- Open the VirtualBox application and select Import Appliance from the File menu.
- Browse for the OVA disk image you downloaded, click the Open button, then click Continue.
- In the Appliance settings, change the name of the VM to
leaf01, then click Import to begin the import process.
- In the VirtualBox Manager window, right click the
leaf01VM, then select Clone. - Change the name of the VM to
leaf02, then click Continue. - Make sure Full Clone is selected, then click Clone.
- Repeat steps 4 through 6 to create
spine01.
Configure GNS3
Open the GNS3 application and create a new project.
From the GNS3 menu, select Preferences.
From the left pane of the Preferences dialog, select VirtualBox. Then, in the Path to VBoxManage field, enter the location where you installed VBoxManage. For example:
/usr/bin/VBoxManage.From the left pane, select VirtualBox VMs, then click New. The VM list shows the VirtualBox VMs you set up earlier.
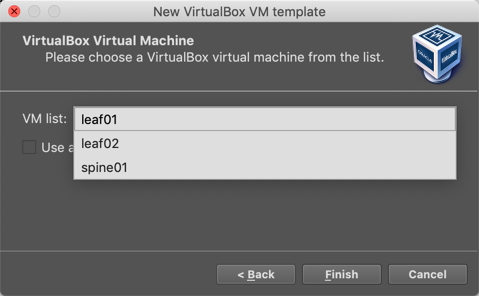
From the VM list, select leaf01, then click Finish. The VM you selected appears in the center pane. Repeat this step for leaf02 and spine01.
Enable GNS3 to work with the network interfaces of the VirtualBox VMs:
In the center pane, select leaf01 then click Edit.
In the VirtualBox VM template configuration dialog, click the Network tab.
Increase the number of Adapters to 4.
From the Type dropdown, select Paravirtualized Network.
Select Allow GNS3 to use any configured VirtualBox adapter.
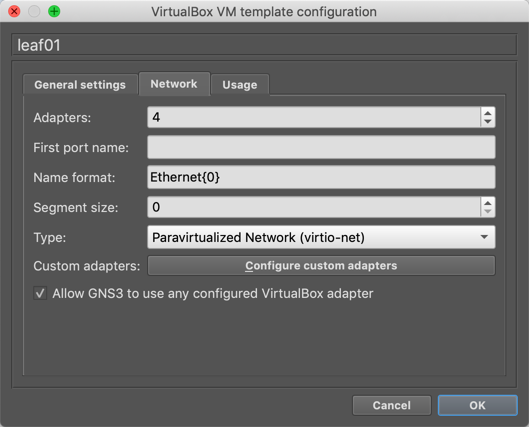
Click OK to save your settings and close the dialog.
Repeat these steps for leaf02 and spine01, then click OK to close the Preferences dialog.
Create Network Connections
Create the network connections between leaf01, leaf02, and spine01, as shown in the two leaf, one spine topology above.
- Click
 (Browse all Devices button), then from the
 End Devicespanel, drag leaf01, leaf02, and spine01 to the console. - Click the
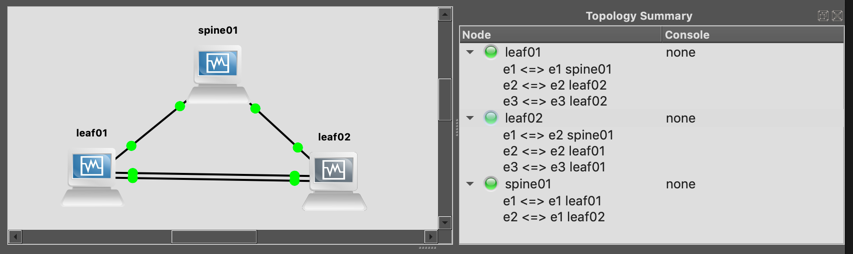
 (cable icon), then connect the leafs and spine by selecting the network interfaces, as shown in the Topology Summary below:
e1in GNS3 corresponds toswp1in Cumulus VXe2in GNS3 corresponds toswp2in Cumulus VXe3in GNS3 corresponds toswp3in Cumulus VX
- Start the VMs.
Log into the Switches
Log into each switch with the cumulus account and default password cumulus. When you log in for the first time, you are prompted to change the default password.
If you are using Cumulus VX 4.1.1 or earlier, the default password is CumulusLinux!. You are not prompted to change the default password.
For more information on the required password change, see the Cumulus Linux documentation.
Basic Switch Configuration
Run these commands on each switch to change the hostname and bring up the interfaces. Exit the switch, then log back in to see the new hostname at the prompt.
cumulus@cumulus:mgmt:~$ net add hostname leaf01
cumulus@cumulus:mgmt:~$ net add interface swp1,swp2,swp3
cumulus@cumulus:mgmt:~$ net commit
cumulus@cumulus:mgmt:~$ exit
cumulus@cumulus:mgmt:~$ net add hostname leaf02
cumulus@cumulus:mgmt:~$ net add interface swp1,swp2,swp3
cumulus@cumulus:mgmt:~$ net commit
cumulus@cumulus:mgmt:~$ exit
cumulus@cumulus:mgmt:~$ net add hostname spine01
cumulus@cumulus:mgmt:~$ net add interface swp1,swp2
cumulus@cumulus:mgmt:~$ net commit
cumulus@cumulus:mgmt:~$ exit
Verify Configuration
Run the following commands on each switch to verify the configuration:
It might take a few minutes for the LLDP information to update. If your command output is different from the output shown below, wait a few minutes, then run the command again.
cumulus@leaf01:mgmt:~$ net show lldp
LocalPort    Speed    Mode          RemoteHost     RemotePort
-----------  -------  ------------  ------------   ------------
swp1         1G       Default       spine01        swp1
swp2         1G       Default       leaf02         swp2
swp3         1G       Default       leaf02         swp3
cumulus@leaf02:mgmt:~$ net show lldp
LocalPort    Speed    Mode          RemoteHost     RemotePort
-----------  -------  ------------  ------------   ------------
swp1         1G       Default       spine01        swp2
swp2         1G       Default       leaf01         swp2
swp3         1G       Default       leaf01         swp3
cumulus@spine01:mgmt:~$ net show lldp
LocalPort    Speed    Mode          RemoteHost     RemotePort
-----------  -------  ------------  ------------   ------------
swp1         1G       Default       leaf01         swp1
swp2         1G       Default       leaf02         swp1
Run the following commands on each switch to show system information:
cumulus@leaf01:mgmt:~$ net show system
Hostname..............leaf01
Build.................Cumulus Linux 4.2.0
Uptime................0.00.23.740000
Model.................Cumulus VX
Memory................768MB
Disk..................6GB
Vendor Name...........Cumulus Networks
Part Number...........4.2.0
Base MAC Address......4:00:27:39:B1:12
Serial Number.........4:00:27:39:B1:12
Product Name..........VX
Next Steps
- Read the Cumulus Linux User Guide to learn about using Cumulus Linux and test out features on your switches.
- Visit the NVIDIA Cumulus web site, which offers many resources to help you understand Cumulus Linux.
- Try some of the advanced configuration. You can update your virtual environment to be able to use the Cumulus Linux on demand self-paced labs (a quick and easy way to learn the fundamentals). You can also run the topology converter to simulate a custom network topology with VirtualBox and Vagrant, or KVM-QEMU and Vagrant.
- Try NVIDIA AIR, which is a free, personal, virtual data center network that provides a low-effort way to see Cumulus Networks technology in action. This is a good way to try out Cumulus Linux if you have platform or disk limitations.